
⏱️ Estimated reading time: 13 min

Key Takeaways
If you have ever tried to insert swimming earplugs correctly and still felt water sneaking around them, you are not alone. One of the most common complaints we hear from swimmers is exactly this: “The earplug was in, but the water found a way through.” The problem is rarely the earplug. The ear canal is not a straight tube. It follows a shallow S-shaped path roughly 2.5 to 3 centimetres long, and the outer third is made of cartilage, flexible, angled, and moveable. Without accounting for that anatomy, even a well-designed earplug will seat against a curved wall rather than seal at its intended depth.
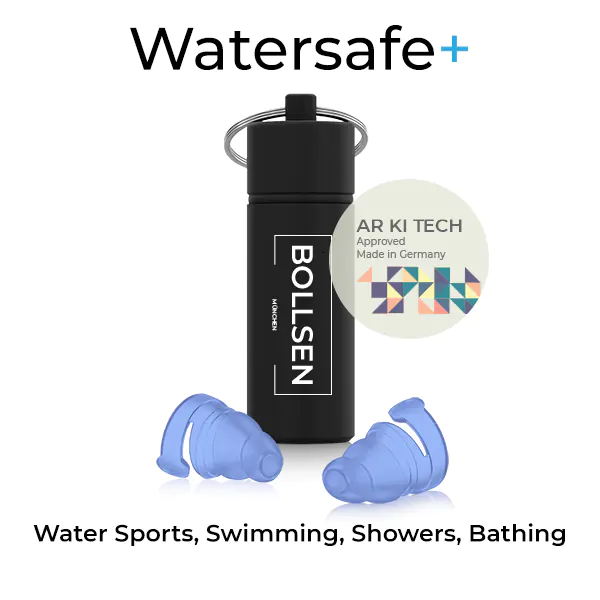
At BOLLSEN, we make hearing protection trusted by over 1,000,000 people worldwide, including the Watersafe+, a dual-flange medical-grade silicone earplug built for swimmers. This guide covers the insertion technique that actually works, the anatomical reason behind it, and what to do when the standard advice still leaves you leaking.
Why does your ear canal shape matter for earplug insertion?
The external auditory canal runs from the outer ear to the tympanic membrane (eardrum) in a path that is neither straight nor uniform. The outer third, around 8 mm, is cartilaginous and is attached to the flexible structures of the outer ear, moving when you pull your earlobe. The inner two-thirds, around 16 mm, are osseous, meaning bony, and completely rigid.
This cartilaginous outer portion sits at an angle to the osseous inner canal, creating the characteristic S-shape described in anatomical research on the external auditory canal. When you simply push an earplug straight in without adjusting, it presses into that angled cartilaginous section and stops short of its sealing position. The plug appears to be in. It is not properly seated.
Pulling the earlobe down and back physically straightens the cartilaginous section, aligning it with the osseous canal and creating a clear, unobstructed path. That is the entire anatomical basis for the technique, and it is why skipping this step is the root cause of most insertion failures.
How do you insert swimming earplugs: step-by-step?
These steps apply to flanged silicone swimming earplugs, including the Watersafe+. Follow each one in sequence for a watertight seal every time.
- Dry your outer ear before insertion. Moisture on the skin around the canal entrance reduces friction and can allow the earplug to shift during insertion. A quick pat with a towel before you get in the water takes seconds and makes the initial seal more reliable.
- Warm the silicone between your fingers for 15 to 20 seconds. Medical-grade silicone stiffens slightly at lower temperatures. Warming it softens the material and allows both flanges to conform more readily to the contours of your individual canal on first contact.
- Reach your opposite hand over your head and pull your earlobe down and back. Use your right hand to insert into your right ear if that is more comfortable, but the earlobe pull with the opposite hand gives better traction and a more consistent angle. Hold the pull steady throughout the next step.
- Insert the earplug with a gentle rotating motion, not a push. Place the stem of the earplug at the canal entrance and turn it slowly as you ease it inward. The rotating motion guides each flange past the slight bend in the canal without forcing. Stop when you feel the outer flange sit flush against the canal entrance. Do not continue pushing.
- Release the earlobe and give the earplug a gentle backward tug. Once you let go of the earlobe, the canal returns to its resting angle and the cartilaginous section gently grips the earplug. A light tug away from your ear confirms the seal: resistance means it is seated correctly. If it moves easily, repeat from step three.
- If you wear a swim cap, pull it low over your ears. This is a legitimate retention tip used by experienced swimmers: a cap pressed low over the ears holds the outer flange in place against the pressure differentials of flip turns and diving entries. It does not substitute for proper insertion, but it does extend how long the seal holds under dynamic movement.
Does the technique change for flanged versus moldable earplugs?
Yes, and the differences matter more than most swimming guides acknowledge. Flanged silicone earplugs and moldable silicone putty earplugs use fundamentally different sealing mechanisms, which means the insertion steps are not interchangeable.
| Feature | Flanged silicone (e.g. Watersafe+) | Moldable silicone putty |
|---|---|---|
| Sealing mechanism | Dual flanges seat at specific depth points inside the canal | Putty is pressed over the canal entrance, sealing from outside |
| Earlobe pull required? | Yes, essential for correct flange seating depth | Less critical; putty does not need to enter the canal |
| Insertion motion | Gentle rotating twist, stop when outer flange is flush | Flatten over opening, mould with fingertip pressure |
| Warming required? | 15–20 seconds; softens silicone for better flange compliance | Yes; putty must be warmed until pliable before shaping |
| Depth inside canal | Outer flange at canal entrance; inner flange ~6–8 mm deep | Does not enter the canal |
| Reusability | Up to 100 uses | Single-use or very limited reuse |
| Seal under flip turn pressure? | Strong; flanges resist displacement from pressure differentials | Moderate; putty can dislodge from vigorous movement |
The dual-flange design of the Watersafe+ creates two independent sealing contact points inside the canal rather than one. This is why the earlobe-pull technique is non-negotiable for flanged earplugs. The inner flange must reach its seating depth inside the straightened canal. If the canal is curved during insertion, the inner flange stops against the angled wall and the second seal point is never formed.


For a full comparison of earplug types by swimming scenario, the choosing the right earplugs to insert for your swimming style guide covers open water, pool, and competitive use cases side by side.
Why do my swimming earplugs keep leaking?
The most common insertion failure is not a technique error. It is a size mismatch that technique cannot fix. If the earplug’s outer flange diameter is too large for your canal entrance, it will sit proud of the opening and neither flange will reach seating depth. If it is too small, the flanges contact the canal walls without enough lateral pressure to seal. In both cases, the earplug appears inserted but water follows the gap between flange and wall.
Size mismatch is behind the majority of “I’ve tried every earplug and they all fall out” complaints that swimmers report. The instinct is to blame unusual anatomy, but the ear canal diameter in adults ranges from 6 to 9 millimetres, a wide enough range that a single standard size genuinely does not fit everyone. If you have followed every insertion step correctly and still experience leakage, the issue is almost certainly diameter, not technique.
For swimmers where fit accuracy matters most, the Watersafe+ AR KI TECH fit-measurement service uses AI ear canal analysis to determine the correct size before the earplug ships, reducing the return rate to 3%. Upload two photos of your ears and the correct size is confirmed before dispatch, with no app download required.
Does insertion technique actually prevent swimmer’s ear?
Otitis externa (swimmer’s ear) develops when water becomes trapped in the ear canal and shifts the canal’s pH, creating conditions that allow bacterial growth. The primary pathogens are Pseudomonas aeruginosa and Staphylococcus aureus, both of which are covered in detail by the NCBI StatPearls clinical review of otitis externa. Water remaining in the canal after swimming is the primary risk factor, not the act of swimming itself.
This is where insertion quality becomes directly relevant to infection risk. A properly seated dual-flange earplug creates a watertight barrier at two points inside the canal, preventing water ingress throughout the swim. An improperly seated one, where the inner flange has not reached seating depth, may feel like it is in place but leaves a gap through which water passes and then pools behind the plug rather than draining freely. That trapped water is a more concentrated infection risk than water entering an unprotected canal.
Research published in the journal Otolaryngology on soft silicone earplug efficacy in water found that without earplugs, water intrusion rates reach 88% after vertical submersion. Soft silicone earplugs had the lowest water intrusion rate of all tested types when correctly inserted. The CDC guidelines on preventing swimmer’s ear recommend earplugs as the primary prevention strategy for regular swimmers.
The NHS Inform guidance on otitis externa also recommends earplugs for regular swimmers and notes that keeping the ear canal dry after swimming is equally important. Tilt your head to each side after removing the earplugs and allow water to drain before drying gently with the corner of a towel.

How should you remove swimming earplugs safely?
A properly sealed dual-flange earplug creates a mild vacuum between the inner flange and the tympanic membrane. Pulling the earplug straight out breaks that vacuum abruptly, transferring a negative pressure wave directly to the eardrum. In most cases the effect is momentary discomfort; repeated abrupt removal over time can cause irritation to the canal lining.
The correct removal technique takes three seconds. Press lightly on the tragus (the small cartilage flap at the front of your ear canal opening) to introduce a small amount of air and equalise the pressure on both sides of the seal. Then ease the earplug out with a slow, rotating motion in the opposite direction to insertion. The rotation breaks the flange contact gradually rather than all at once.
Does earplug size matter as much as technique?
Technique and size are not independent variables. They interact. Perfect technique with the wrong size earplug cannot produce a seal, and the right size earplug inserted without the earlobe-pull step will not reach its correct seating depth. Both need to be right.
The BOLLSEN pillar page covering earplugs for water covers fit and selection across all water activities, including pool, open water, surfing, and diving. If you are confident in your technique but still experiencing leakage, that page is the right next step.
For swimmers who want to confirm fit before committing to a pair, the AR KI TECH service at Watersafe+ swimming earplugs with a 24 dB seal allows photo-based ear canal measurement so the correct size arrives the first time.
Insertion technique is learnable in one pool session. Once the earlobe-pull step becomes automatic and you have confirmed the earplug size is right for your canal, a properly sealed swim is the consistent result. The swimmers who say they have “weird ears” almost always discover they had the wrong size, the wrong technique, or both.

His connection to hearing protection stems from personal experience with sound sensitivity during live events and work in noisy environments, an issue that made him more aware of the long-term risks of unmanaged noise exposure. Today, as both a communicator and a user of BOLLSEN products, he is passionate about raising awareness around the importance of proactive hearing care.
At BOLLSEN, he develops data-driven marketing campaigns, writes SEO-focused articles, and manages communication channels that connect customers with practical knowledge about hearing protection. His work ensures that BOLLSEN’s message—prioritizing health, performance, and sustainability reaches a global audience in an engaging and trustworthy way.
Passionate about writing since childhood, Timotej combines creativity with a strong analytical approach, continuously testing new ideas in digital marketing, performance advertising, and social media. He believes in learning through innovation and collaboration, balancing leadership with openness to new perspectives.
Beyond his professional role, Timotej is committed to a healthy lifestyle and finds inspiration in fitness, sports, and quality time with friends. His personal passion for well-being aligns with BOLLSEN’s core values, making his work not only a career but also a cause he deeply believes in.